- ◆Getting a new client is the part most small businesses focus on. What happens next tends to be done from memory, in a slightly different order each time, and something occasionally gets missed.
- ◆This guide covers what a complete onboarding sequence looks like, how to build one in Make.com, and how to make it feel personal even when it runs automatically.
- ◆No code. Works with most contract, payment, and booking tools.

Someone confirms they want to work with you. Now what?
For most small businesses the honest answer is: it depends on the day. Contract goes out, usually. Welcome email, probably. Information form, if you remembered. Done from memory, in a different order each time.
That inconsistency costs more than it looks. The first few interactions set the tone for the whole relationship. A smooth start produces clients who refer and stay longer. A patchy one produces questions, gaps, and occasionally awkwardness.
This guide builds an onboarding sequence that runs the same way every time from the moment a client commits.
What You Will Learn
– What a complete onboarding sequence looks like
– The right trigger and why it matters
– How to build it in Make.com, step by step
– What each message should say
– How onboarding connects to the other four posts in this series
What Onboarding Actually Covers
Onboarding is everything that happens between a client saying yes and the work starting. Not a complicated process. Just the practical steps that need to happen so both sides know what is going on.
Here is what a complete onboarding sequence covers and when each step happens.
| Step | When it happens | Why it matters |
|---|---|---|
| Contract sent | Immediately on trigger | Protects both sides before anything begins |
| Payment requested | Same time or within hours | Sets the financial expectation before the work starts |
| Information form | After contract signed | Gets what you need without a back-and-forth email chain |
| Welcome email | After contract signed | Sets the tone, answers common questions before they are asked |
| First booking | Within 24 hours | Gets something in the diary so momentum does not stall |

The Right Trigger And Why It Matters
The most important decision in building this automation is choosing the right trigger. Get it wrong and you are onboarding people who have not committed yet, or missing people who have.
Start on the contract or payment, not the verbal yes
Do not trigger onboarding when someone says yes in an email or a call. Trigger it when the contract is signed or the deposit is paid. That is when they have actually committed. Onboarding someone who has not yet signed creates confusion and occasionally awkwardness if they change their mind.
The most common triggers are a contract signed in DocuSign or PandaDoc, a payment received in Stripe or GoCardless, a deal moved to a specific stage in your CRM, or a form submitted confirming the client is proceeding. Pick whichever happens first in your process and represents genuine commitment.
If you are not sure which modules fit your specific setup, the Make Master tells you exactly what to search for in about 60 seconds.
How to Build the Onboarding Sequence in Make.com
This is the most involved build in the series, more steps than the lead follow-up or invoice chasing sequences. Take it one module at a time. Each step connects to the next.
- A contract tool connected to Make.com – DocuSign, PandaDoc, or similar
- A payment tool – Stripe, GoCardless, or similar
- An information-gathering form – Jotform, Typeform, or Google Forms
- A Make.com account – free to start
- Your welcome email written and ready to paste in
- A booking link or calendar tool for the first session
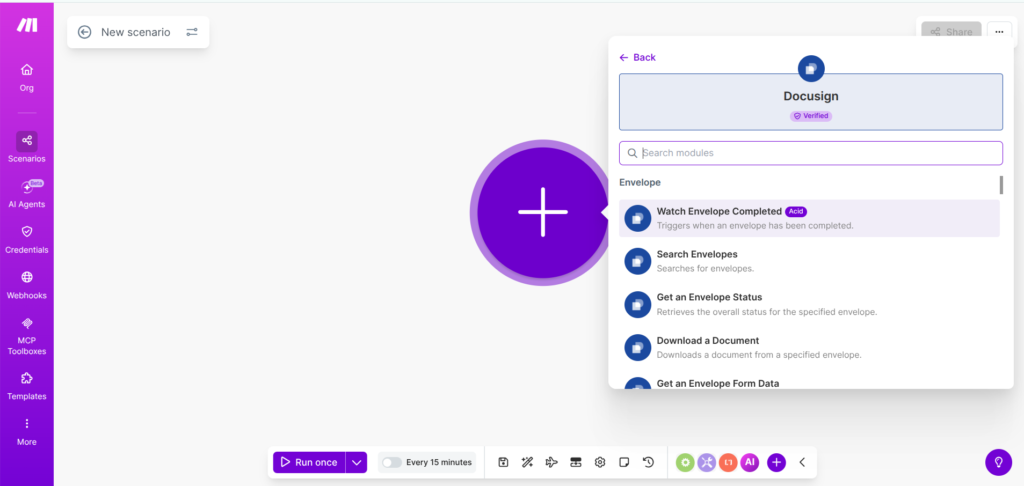
Step 1 — Set Your Trigger
In Make.com, connect your contract or payment tool and select the trigger that fires when a contract is signed or a payment is received. DocuSign, PandaDoc, and Stripe all have direct integrations in the module library.
If your tool is not in the library, most contract platforms offer a webhook when a document is completed. Use the Webhooks module in Make.com and paste the URL into your contract tool’s notification settings.
Still stuck? Ask an AI to walk you through it
This is the most involved build in the series and the trigger setup is where most people get stuck. A few common pitfalls worth knowing before you start.
Contract tool not in the Make.com library. Use the Webhooks module instead. Select Custom Webhook, copy the URL Make.com generates, and paste it into your contract tool’s notification settings. No API key needed.
Validation errors on email modules. Change the Body type from “Collection of contents” to plain Text. Paste your email content directly into the text box that appears.
Form not appearing in the module search. Make sure your Google Form has a linked Google Sheet. Open the form, go to Responses, and click the green Sheets icon to link it.
If you are still hitting errors, paste the exact error message into Claude or ChatGPT and describe what you are trying to connect. Something like: “I am building a client onboarding sequence in Make.com and getting [error]. Walk me through fixing it.” Both have free plans and are good at Make.com troubleshooting step by step.
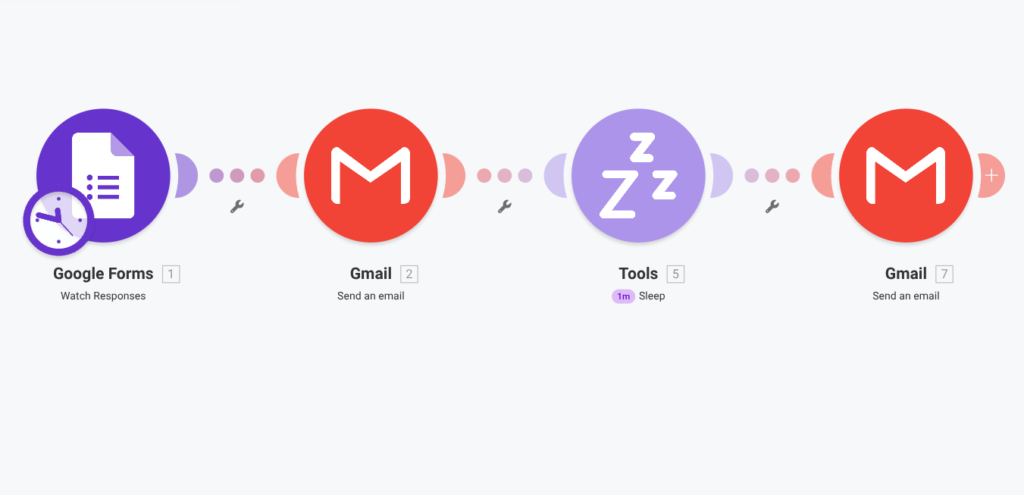
Step 2 — Send the Welcome Email
The first module after the trigger is an email. This one should feel the most human. Not a confirmation notice. A genuine welcome that sounds like it came from you.
Keep it short. Tell them you are looking forward to working together, what happens next, and roughly when they will hear from you. That is enough.
“Hi [first name], really glad to have you on board. Here is what happens next: [two or three sentences on your process]. You will hear from me [timeframe]. In the meantime, if anything comes up just reply to this. Looking forward to working together.”
Step 3 — Send the Information Form
Immediately after the welcome email, or with a short delay, send your information-gathering form. This collects what you need before the work starts without a back-and-forth email chain.
Keep the form short. Ask only for what you genuinely need before the first session. Anything that can wait, let it wait.
“Hi [first name], to get things moving I have sent across a short form, should take about five minutes. It covers the basics I need before we start. [Form link.] If anything on there is unclear just reply and let me know.”
Step 4 — Add an Internal Notification
After the form send, add a module that notifies you. A Slack message, an email to yourself, or a task in your project management tool. Something that makes the new client visible without you having to check.
Easy to skip. Worth doing. Knowing a new client has been triggered without having to remember to check is worth the two minutes to set up.
Step 5 — Form Completion Check and Reminder
Add a 48-hour Sleep module. Then check whether the form has been completed. If yes, continue. If no, send a brief nudge.
“Hi [first name], just a nudge on the form I sent across [link]. Only takes a few minutes. Helps me hit the ground running when we speak.”
Step 6 — Send the Booking Link
Once the form is completed, send the booking link for the first session. Get something in the diary while the momentum is still there.
“Hi [first name], here is a link to book our first session: [booking link]. Looking forward to it, see you then.”
Automation handles the timing. You handle the warmth.
The welcome email in particular should sound like you wrote it. Write it in your own voice. Use the client’s first name. Do not automate the personal bit out of it. That is the part that matters most at this stage.

Testing Before You Go Live
Use a test contract or a dummy payment in your payment tool. Run the scenario in Make.com using Run Once and watch each module fire. Check the welcome email arrives, the form link works, the internal notification lands, and the booking link sends correctly.
Submit the test form yourself and check the sequence continues as expected. Mark the test payment or contract as cancelled when done so it does not sit in your live records.
How Onboarding Connects to the Rest of the Series
This is where the pieces from the other four posts come together.
The lead follow-up sequence from Post 2 handles everything up to the point someone commits. When they do, the onboarding sequence picks up from there. The two work in sequence — follow-up converts the lead, onboarding starts the relationship.
Setting clear payment expectations in onboarding is what makes the invoice chasing sequence from Post 3 work cleanly. Good onboarding reduces late payment.
The questions clients ask in their first week are almost always the same ones. The pre-answer content from Post 4 feeds directly into the welcome email. Write it once, use it in both places.
- Trigger connected and tested with a dummy contract or payment
- Welcome email written in your own voice and proofread
- Information form built, tested, and linked correctly
- Internal notification set up and tested
- Form completion check and reminder configured
- Booking link tested and working
- Full test run completed with a dummy client
Rather Have It Built For You?
This is the most involved build in the series. If you would rather hand it over and get it back working, that is what Spark Automations does. The Discovery Audit maps out exactly what to build and where to start.
Book a Discovery Audit →Questions People Actually Ask
Set up a Make.com scenario triggered when a contract is signed or a payment is received. The sequence sends a welcome email, an information form, an internal notification, a form reminder if needed, and a booking link. The full build is covered above.
At minimum: a welcome email, an information-gathering form, and a booking link for the first session. Contract and payment should come before anything else.
Write the welcome email in your own voice. Use the client’s name. Keep it short. The automation handles the timing, the words are still yours.
Contract signed or deposit paid, whichever represents genuine commitment in your process. Do not trigger on a verbal yes. Wait until something is confirmed.
Yes. Make.com’s free plan handles this. You need a contract tool, a payment platform, and a form builder, most of which you likely already have.
A few hours the first time. It is the most involved build in this series but also the one that pays off most, every new client benefits from it immediately.
Only what you genuinely need before the first session. Keep the form to five to eight questions. Anything that can wait until you speak, let it wait.
Send one reminder at 48 hours. If they still have not completed it, follow up manually. Do not send more than one automated reminder for this.
The complete series
Five posts. Five automations. Each one saves a different chunk of your week.
Part 1: The 5 Admin Jobs That Are Quietly Eating Your Week
Part 2: Your Leads Are Not Going Cold. You’re Just Not Following Up Fast Enough.
Part 3: Getting Paid Shouldn’t Be This Uncomfortable
Part 4: Your Clients Are Asking the Same Questions Every Week. Here’s How to Stop Answering Them.
Part 5: What Happens After Someone Says Yes? (Most Businesses Wing It) – You are here.